I've been getting some questions lately about how to start and shutdown a VirtualBox VM automatically after showing how to set up a virtualized Development Environment for Drupal 10 / 11 on a past blog so I'm writing this post to guide you on how to make a VirtualBox VM start and shutdown when your System boots-up or shuts-down/restarts so all your PHP apps hosted under this architecture will be available without having to manually turn on your VM's as if you were using any Docker solution.
On this post I'm focusing primarily on Mac OS 13.7 and above and Ubuntu 22.04, 24.04 all running VirtualBox 7.0 version (7.1 must work as well). You can check the autostart official documentation provided by VirtualBox if you want to try the methods proposed in the official docs. I'm taking a different approach here since I ran into issues with the shutdown process of the VM's when attempting to run what is described in the VBox documentation, after every reboot or shutdown of my Host computer, the VM's just won't start and they show an "Aborted" status on the GUI. Another useful resource you might want to checkout is the VBoxManage documentation.
As of the first step, for both MacOS or Ubuntu, open up a terminal and in order to get the VM ID you want to work with, run:
% VBoxManage list vmsAfter running the command above you should get an output similar to the next screenshot that is showing the list of VM's you have created on VirtualBox:

Ok, let's start with Mac OS. Thanks to this Github Repo code, I created a small solution based on it that focuses on the tasks we need to achieve the automation of our VM's when the Host goes on or off, download the following zip file and extract it on your HOME folder, you could extract it anywhere you want but I strongly suggest you use your HOME to avoid editing the template files, it's up to you:
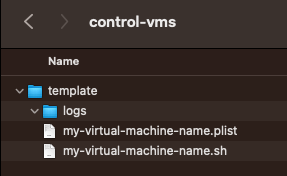
Once you have the extracted folder in your HOME you'll find the following structure under the control-vms/ folder:

The template/ folder contains an empty logs/ folder, we'll talk about it in a bit, and two files, one called my-virtual-machine-name.sh that contains the bash instructions that will be executed on boot or shutdown and the other file, my-virtual-machine-name.plist which is the definition file for the service you'll be registering so MacOS can execute the bash instructions above as a system deamon.
Now, copy and paste the template/ folder inside control-vms/ and rename the new folder with a name that describes your VM, for example "ubuntu22-server" as shown in the next screenshot:

Also, replace the names of the files, meaning the .sh and the .plist files using the same name. As for the .plist file, for naming convention use a dot "." to separate strings in the new name. You can do this for every Virtual Machine you want to auto start on boot.
Using a text editor open the .sh .plist files and edit accordingly:
1) For the .sh file make sure to use the VM ID not the VM Name, this is important! Replace:
“MY-MACOS-USER” with your MacOS user.
"MY-VM-ID" with the proper VM ID you got from running "VBoxManage list vms" as shown above (don't include the braces)
#!/bin/bash
#
# Author: Vincenzo D'Amore v.damore@gmail.com
# 20/11/2014
#
# Replace MY-MACOS-USER with your MacOS user i.e: jhon
# Replace MY-VM-ID with the VM ID you want to manage.
function shutdown()
{
  #echo `date` " " `whoami` " Received a signal to shutdown"
  # INSERT HERE THE COMMAND YOU WANT EXECUTE AT SHUTDOWN
  sudo -u MY-MACOS-USER /usr/local/bin/VBoxManage controlvm MY-VM-ID acpipowerbutton
  exit 0
}
function startup()
{
  #echo `date` " " `whoami` " Starting..."
  # INSERT HERE THE COMMAND YOU WANT EXECUTE AT STARTUP
  sudo -u MY-MACOS-USER /usr/local/bin/VBoxManage startvm MY-VM-ID --type=headless
  tail -f /dev/null &
  wait $!
}
trap shutdown SIGTERM
startup;
Make the .sh file executable, replace MY_MACOS-USER, MY-VM-FOLDER-NAME, MY-VIRTUAL-MACHINE-NAME accordingly and run:
% chmod +x /Users/MY_MACOS-USER/control-vms/MY-VM-FOLDER-NAME/MY-VIRTUAL-MACHINE-NAME.sh2) For the .plist file replace:
- BOOT.SHUTDOWN.SERVICE : Name of the service, use a name that describes your VM i.e: VBOX.UBUNTU22.SERVICE
- MY-MACOS-USER : Replace with your MacOS correct username, the user that created the VMS, i.e: jhon.
- MY-VIRTUAL-MACHINE-NAME: A name that describes your VM, log files will be automatically created under the logs/ folder using that name.
<?xml version="1.0" encoding="UTF-8"?>
<!DOCTYPE plist PUBLIC "-//Apple//DTD PLIST 1.0//EN" "http://www.apple.com/DTDs/PropertyList-1.0.dtd">
<plist version="1.0">
<dict>
<!--
  You should customize the following placeholders:
- BOOT.SHUTDOWN.SERVICE : Name of the service, use a name that describes your VM i.e: VBOX.UBUNTU22.SERVICE
- MY-MACOS-USER : Replace with your MacOS correct user, the user that created the VMS, i.e: jhon.
- MY-VIRTUAL-MACHINE-NAME: A name that describes your VM, log files will be created under the logs/ folder using that name.
-->
<key>Label</key>
<string>BOOT.SHUTDOWN.SERVICE</string>
<key>ProgramArguments</key>
<array>
  <string>/Users/MY-MACOS-USER/control-vms/my-virtual-machine-name.sh</string>
</array>
<!--
set RunAtLoad false if you don't want that script starts
automatically every time your mac os x boots
-->
<key>RunAtLoad</key>
<true/>
<key>WorkingDirectory</key>
<string>/Users/MY-MACOS-USER/control-vms</string>
<key>StandardOutPath</key>
<string>/Users/MY-MACOS-USER/control-vms/MY-VIRTUAL-MACHINE-NAME.log</string>
<key>StandardErrorPath</key>
<string>/Users/MY-MACOS-USER/control-vms/MY-VIRTUAL-MACHINE-NAME.err</string>
<key>ExitTimeOut</key>
<integer>600</integer>
</dict>
</plist>
3) Copy the .plist file into /Library/LaunchDemons:
% sudo cp /Users/MY-MACOS-USER/control-vms/MY-VM-NAME-FOLDER/MY-VIRTUAL-MACHINE-NAME.plist /Library/LaunchDemons4) And in order to Load the Service, run:
% sudo launchctl load -w /Library/LaunchDaemons/MY-VIRTUAL-MACHINE-NAME.plist Running the above should also start your VM.
Done! You can now restart you Mac and once its up you can open the VirtualBox GUI and confirm the status of your VM.
5) Additionally, if you want to disable the service of any of your Virtual Machines daemons that you registered just run:
% sudo launchctl unload -w /Library/LaunchDaemons/MY-VIRTUAL-MACHINE-NAME.plistRunning the above should also shutdown your VM. Run step 4 to re-enable the VM service.
Note: I tested the scripts on MacOS Ventura 13.7 but it should work on Sonoma and Sequoia as well.
Alright, it's Ubuntu time! On Ubuntu the steps are a little more simpler, let's use the Systemd Service Unit to create a system service, open up a terminal and paste the command below, make sure to replace "MY-SERVICE-NAME"with a name of your preference:
$ sudo nano /etc/systemd/system/MY-SERVICE-NAME.serviceOnce nano opens, copy and paste the instructions below and make sure to replace "MY-UBUNTU-USER" with your correct username and "MY-VM-ID" with the Virtual Machine ID you want to use.
[Unit]
Description=Autostart VirtualBox VM
After=network.target vboxdrv.service
Before=runlevel2.target shutdown.target
[Service]
User=MY-UBUNTU-USER
Group=vboxusers
Type=forking
TimeoutSec=5min
IgnoreSIGPIPE=no
KillMode=process
GuessMainPID=no
RemainAfterExit=yes
ExecStart=/usr/bin/VBoxManage startvm MY-VM-ID --type=headless
ExecStop=/usr/bin/VBoxManage controlvm MY-VM-ID acpipowerbutton
[Install]
WantedBy=multi-user.target
Now that we have created the definition file for our new systemd service, we have to reload the services handler, run:
$ sudo systemctl daemon-reloadIn order to test the service you can always start/stop it by running the following, replace "MY-SERVICE-NAME" with the name you provided above:
## Start the service:
$ sudo systemctl start MY-SERVICE-NAME.service
## Stop the service:
$ sudo systemctl stop MY-SERVICE-NAME.service
Running these will also start or stop your VM.
And finally, to enable the service so it can be executed when you turn on or off your PC run the following command, replace "MY-SERVICE-NAME" with the name you provided above:
$ sudo systemctl enable MY-SERVICE-NAME.serviceIf you want to disable the service, run:
$ sudo systemctl disable MY-SERVICE-NAME.serviceIn order to see the status of your service, run:
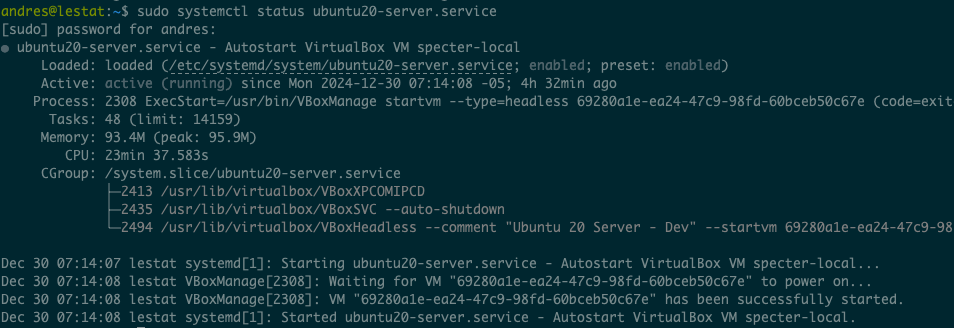
$ sudo systemctl status MY-SERVICE-NAME.serviceand if all is Ok, you should get an output similar to the nex screenshot:

Note: I tested this approach on Ubuntu Desktop 20.04, 22.04 and 24.04 LTS releases.
That's all for Ubuntu! Reboot your system and after you log in you can confirm on the VirtualBox GUI the status of your VM. Let me know in the comments below if you find any issues or have questions. Enjoy!
Hi Z, Yes, the script will…
Hi Z,
Yes, the script will automatically execute the acpi shutdown command for a graceful shutdown on the VM on a restart or shutdown of the host machine.

Will the systemd service gracefully shutdown the VM when shutting down, or will it just execute the execstop command and then shutdown anyway without waiting for the VM to completely stop? What about rebooting?